Real Food. Natural Beauty. Reviving traditional methods and nourishing the body from the inside out.
Friday, February 10, 2012
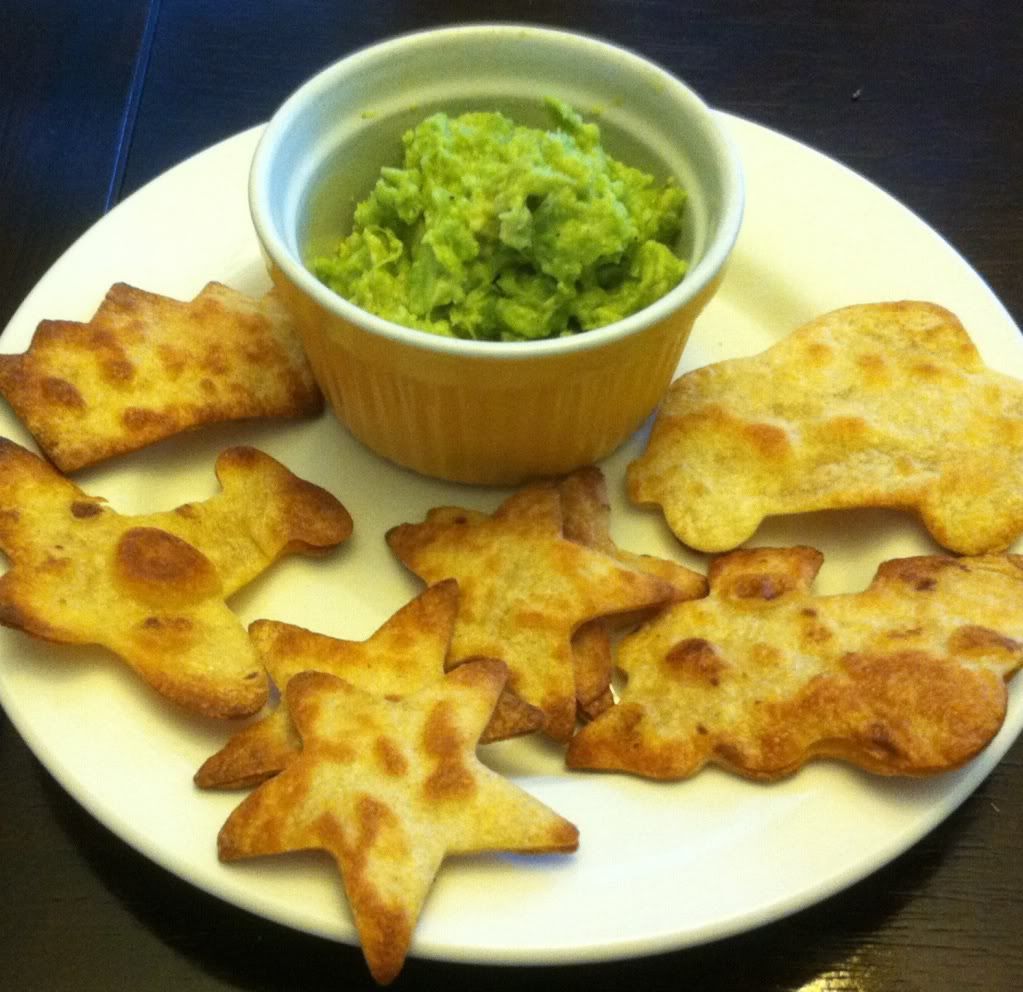
Baked tortilla chips
It was a stunningly gorgeous day here in Northern Cali today. It is the middle of February but judging from the weather, you'd never know. Jayden and I took advantage of the beautiful day and little brother's nap time to get in some much needed one on one time. After giving him several options of things we could do, he of course chose jumping on the trampoline. Forty minutes of serious jumping and we were both tired and ready for a snack. Okay, let's be honest, I was the only tired one, that boy never runs out of steam.
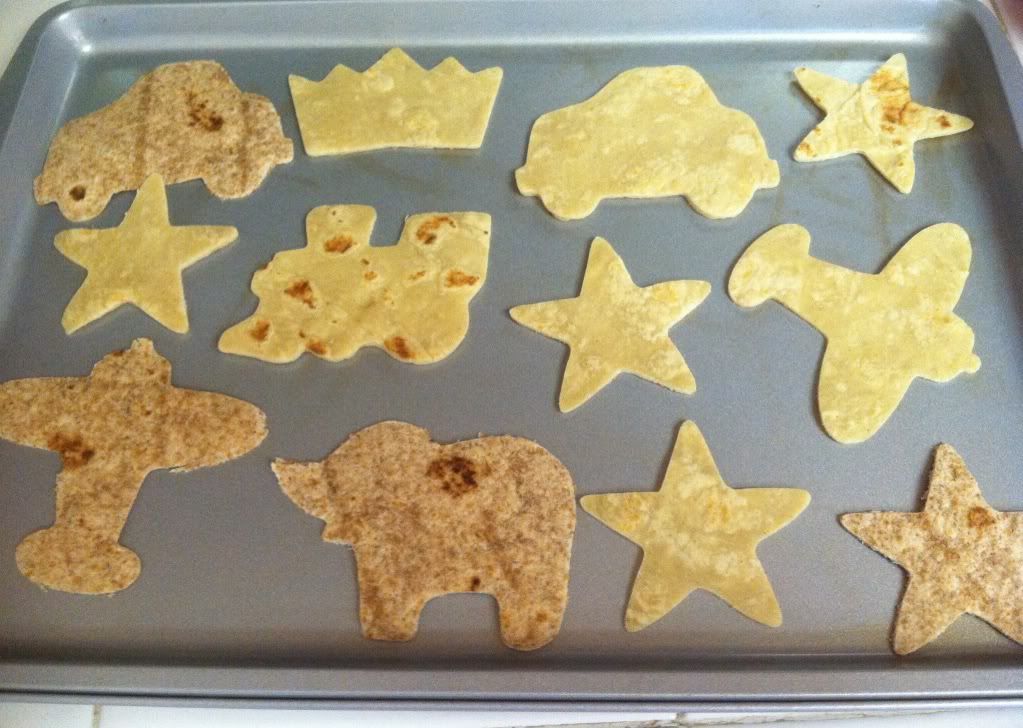
I was getting our snack ready and Jayden wandered into the kitchen and said he wanted to cook something together. I knew we were having tacos for dinner and so I figured we could bake up some tortilla chips. Baking them, as opposed to frying, is obviously much healthier and just as delicious. They bake up crispy with only a trivial amount of oil and then we can reap all the whole grain goodness minus all the fat. Since Jayden was cooking with me, I wanted to make it a little more fun and so we decided to cut our chips into cool shapes. I have a ton of cookie cutters, and being the boy he is, he chose a train, car, and an airplane! I threw in a few other shapes too. He was so excited when he saw his "super cool" chips, he kept asking when dinner was because he couldn't wait to eat them! He said the train was the first one to be gobbled up. Funny how something as simple as cutting tortillas into kid friendly shapes can turn an ordinary snack into something special.
Whole Grain Baked Tortilla Chips
Corn or flour tortillas. ( I used corn and a whole wheat corn blend)
Olive oil
Sea salt
Cookie cutters
Preheat oven to 400. Cut shapes into tortillas and brush both sides with olive oil. Sprinkle with sea salt and place on baking sheet. Put into oven and bake 6-10 minutes, flipping once to ensure even browning. Since ovens can vary, be sure to check chips often to ensure they come out crispy and not burnt!
* Save tortilla scraps to thicken tortilla soup or bake them off too! They might not look as cool, but they'll taste just as good!
Monday, February 6, 2012
Whole Wheat Cinnamon Pita Chips
If you have followed any of my posts. you know how much I love my sweets. I am in a constant struggle between satisfying my sweet tooth and my desire to eat clean and healthy. I wish I were one of those people who can eat dinner and not feel the need to have dessert but as hard as I try I just cannot do it. It's like my taste buds need to have sugar. So, I have come to terms with the fact that I have to make room in my diet for treats. I will not however, indulge on junk. I don't pollute my kids systems with refined, processed, sugar-laden trash so I resolve to not subject my body to it either. That leaves me with the task of finding healthy, nutrient dense goodies to quench my insatiable sweet tooth.
My favorite thing to do in the kitchen is to make over store bought treats and replace the unfavorable ingredients, like high fructose corn syrup and refined grains with their wholesome counterparts. So while perusing the snack aisle at the Nugget the other day, I happened upon Stacy's cinnamon and sugar pita chips. Now, I have been known to knock back a bag or two of those babies in my hay day, but those days are behind me now. I studied the ingredient list and knew I could make them healthier and probably cheaper too! The obvious swap was using 100% whole wheat pitas. By now we all know about the benefits of adding whole grains to our diets and the detriment that refined grains can have on our systems. Refined carbohydrates have been stripped of all their nutrients, which is why products using them have to add nutrients back in. The only other thing I did was increase the amount of cinnamon to sugar ratio. Cinnamon, like most other spices has tremendous health benefits. It has an amazing ability to regulate blood sugar, can boost cognitive function, and contains iron, calcium, fiber, and manganese.
These cinnamon sugar pita chips are so delicious and incredibly easy to make. They only consist of 4 ingredients, most of which we all have in our kitchens at any given time. Plus, by making them at home, you are in control of the amount of fat and sugar that goes in them and you get to enjoy them warm out of the oven! Now the only obstacle you face is practicing enough self control not to eat them all in one sitting!!
Whole Wheat Cinnamon Pita Chips
1 package 100% whole wheat pita bread
1/4 c granulated sugar (may be more or less depending on your preference)
2 T cinnamon
2 T butter, melted
Preheat oven to 350. Try to separate each pita into two, this makes for thinner, crispier chips.* Mix sugar and cinnamon in a small bowl. Place butter in bowl and microwave until melted. Working with one pita at a time, brush both sides with the butter. Sprinkle both sides of the pita with sugar mixture and shake off excess. Cut pita bread with a pizza cutter into wedges. Continue with rest of pitas. Place on ungreased baking sheet and bake for 6-10 minutes or until pitas are crisp.
* You will find that some pitas are more stubborn than others, and you are not able to separate them. Not to worry, you will just end up with thicker chips and will need to increase cooking time to ensure crispy, crunchy chips!
Friday, October 7, 2011
Whole Wheat Pumpkin Waffles
I derive lots of pleasure from making my family a wholesome breakfast. This is the time of year I really start cranking out the pancakes and waffles. Being the holiday obsessed woman that I am, my meals have to include a little seasonal flair from time to time. On today's menu? Pumpkin waffles. Wholesome, nutritious, festive, and delicious, plus they make the whole kitchen smell like pumpkin pie! You can make a batch of these on the weekend, and you'll have plenty of waffles to freeze and pop in the toaster for a quick morning meal. The leftovers can be used to make a quick, nutritious lunch as well. Just toast and let cool slightly, then spread with cream cheese and cut into little sandwiches. Jayden loves when we get to have waffles for lunch!
Whenever breakfast includes a veggie, I get a little excited. Pathetic, right? Excitement over a serving of vegetables? Hey, when you're a mom, you get where you can. Since we have a green smoothie every morning, this means my son is getting TWO servings of veggies first thing in the morning. That's pretty good for a three year old, most adults I know don't get that in a day!! Seeing that fall has finally arrived, I have a ton of canned pumpkin puree in the pantry. I like to stock up on it at Trader Joe's while they have it. It is one of those seasonal items that can go a long way in the kitchen. We mix it in our oatmeal, add it to cookie recipes, and of course, make pumpkin waffles!
* Time saver tip: Sift together the dry ingredients the night before, that way in the morning all you have to do is add the wet ingredients and start pumping out the pumpkin waffles! You'll have breakfast on the table in 10 minutes!
Whole Wheat Pumpkin Waffles
1 c unbleached, all purpose flour
1 1/2 c whole wheat flour
2 1/2 t Baking Powder
1 t Baking Soda
1/2 t Salt
2 t Ground Cinnamon
1/4 t Ground Ginger
1/4 c brown sugar
4 Eggs
1 C Milk
1 Cup Buttermilk
1 C Pumpkin Puree
5 T Butter, melted and cooled
Preheat waffle iron.
Sift first 7 ingredients into a bowl.
Whisk in brown sugar into rest of dry ingredients.
In a separate bowl whisk the remaining ingredients.
Whisk the dry ingredients into the liquid mixture and whisk until smooth.
Pour about 1/2 cup of the pumpkin batter into a waffle iron that’s been buttered or greased and cook according to manufacturer’s directions.
Serve with maple syrup or dust with powdered sugar.
*Allow to cool, place in a Ziploc bag, label and freeze. When ready, place in toaster or oven at 300 and heat for 10 minutes or until heated through.
Thursday, September 1, 2011
No Bake Brown Rice and Oat Crispy Treats
I am always on a quest to find treats that I can feel good about feeding to my family. I admittedly have a HUGE sweet tooth, and I love when I find recipes that I too can indulge in without feeling guilty. Rice crispy treats have been a favorite of mine since I was a kid. I love the texture and the taste. But refined cereal and gooey marshmallows don't necessarily fit into my nutrition mantra. I've managed to make them healthier over the years by using brown rice cereal and adding ground flax and they were delicious as well as much more nutritious. This time I wanted to up the nutrition value even more so I added oats and peanut butter. The result- a cross between an chewy granola bar and a rice crispy treat. Can you say yum???? And don't forget, these bars may taste and look like dessert but they are full of omega 3 fatty acids, protein, fiber, and a whole slough of vitamins and minerals. Tastes good. Good for you. That's my goal with everything I make.
These are a great treat to let the kids help with, Jayden did all the scooping, pouring and mixing. Of course, quite a bit of the mixture found its way into his little mouth along the way, but what fun is cooking if you can't sample the goods? Another reason these treats are a favorite of mine is because they are so easy to make and I don't have to turn on the oven. I can whip up a batch in ten minutes, and being 41 weeks pregnant, (yes you read that right- 41 weeks!) I'll do anything if it can save me some time and doesn't require a lot of energy, because right now I'm short on both. As you can see from the picture I added mini chocolate chips to this batch. Normally I make them without, but since Jayden is about to become a big brother in a matter of days, I figured we could make an extra special treat this time.
Brown Rice and Oat Crispy Treats
1 3/4 c oats ( you can use rolled or quick cooking)
1 3/4 c brown rice cereal ( I use Erehwon)
1/4 c ground flax seed
1/2 c honey, brown rice syrup, agave, or corn syrup ( I use 1/4 c honey and 1/4 c brown rice syrup)
1/2 c brown sugar
1/2 natural peanut butter
1 t vanilla
Other variations to try:
1/4 c mini chocolate chips, put in freezer for 30 minutes before mixing in to prevent melting
1/2 c raisins
1/2 c chopped nuts or seeds
Lightly grease 11 x 7 inch pan. You can use a 13 x 9 but you will end up with a thinner bar.
In a large mixing bowl combine cereal, oats, and flax.
Combine honey, brown rice syrup, and brown sugar in a saucepan over medium heat. Stir until mixture just comes to a boil. Remove from heat and stir in peanut butter and vanilla.
Pour mixture over dry ingredients and mix well until combined. If adding any additional ingredients, do so now.
Transfer mixture to prepared pan and press mixture down evenly.
Put in refrigerator for an hour to set up. After that, they can be stored at room temperature in an airtight container for a week.
Turn out onto a cutting board and cut into desired size bars.
Tuesday, July 12, 2011
Classic Lemonade
I don't know of any other drink as refreshing or tasty on a hot summer day than a big glass of frosty, cold lemonade. Lemonade truly is the quintessential summer beverage, it's tangy and sour with just the perfect amount of sweetness. Bright and cheery- it's sunshine in a glass. I have been on a lemonade binge the last few weeks, ever since my mother-in-law shared this recipe with me. I lost count of how many batches I've made, but it's somewhere around 20. Of course, I am eight months pregnant, and I have been known to make and remake my favorite recipes over and over and over again but seriously, this lemonade is the best I have ever tasted. As soon as I see that pitcher getting dangerously low, I have to start whipping up another batch. The thought of being without a glass is just too much for me to bear.
I have to admit, when I first tried this at my mother-in-law's house, I was a bit skeptical. She said it was the best lemonade she had ever tried and I wondered what was so special about this particular recipe. I still don't know. It only has three ingredients: lemons, sugar, and water. The real beauty of it is that this recipe strikes the perfect balance between sour and sweet. I have tried lots of lemonade recipes over the years, and this is by far the best. The only change I made was adding some of the pulp to mine which gives it a little more lemony kick, which I enjoy. This recipe takes less than ten minutes to make and will soon be your favorite summer drink. Sure, popping open a can of frozen concentrate might save you five minutes, but will also fill you up with high fructose corn syrup. Plus, there is nothing like fresh squeezed juice- it simply tastes better.
Lemonade
1 c water
3/4 c granulated sugar
3/4 c fresh squeezed lemon juice (from approx. 6 lemons)
4 c cold water
lemon pulp
Place 1 c water and sugar into a small saucepan over medium heat. Bring to a simmer and stir occasionally until sugar dissolves, about 3 minutes. Set aside and let cool.
Juice lemons and strain to remove seeds and pulp. At this point, I use a spoon to remove all the seeds and add remaining pulp to lemon juice. Depending on the size and juiciness of your lemons, you may need more than six, but I find that is the average number it takes to yield 3/4 c.
Add lemon juice, pulp, simple syrup, and 4 c water to a large pitcher. Stir well and chill thoroughly before enjoying.
Thursday, June 23, 2011
Fudge Popsicles
Summer is in full swing around here. We have spent every afternoon this week playing in the water. Although an air-conditioned house is very appealing to me in my pregnant state, I can't keep my son inside for the life of me. Everyday following nap time, he requests a rocket popsicle and the sprinklers turned on. Yes, those rocket pops I posted a few days ago are a huge hit with him. Ever since I made them and the weather turned freakishly hot, they are his favorite afternoon snack. Normally, I wouldn't even think of letting him have a popsicle for a snack, but they are made with fresh fruit, and it's summer for goodness sake. Summertime as a kid means getting to do special things, like staying up late, running through the sprinklers, and eating popsicles for a snack. Rocket pops may rank high on his list, just as they did when I was a kid, but as an adult, a new frozen treat has taken their place- the fudgesicle. Creamy, rich, chocolaty, and oh so satisfying. I love them because they are indulgent without being overly sweet. They are the perfect treat to end the day with.
I have tried almost all the Fudgesicles in the markets, and most are really good. I merely wanted all that chocolaty goodness minus all the junk. Look on the back of a box of your favorite fudge pops and you'll likely see a laundry list of ingredients including, sodium chloride, maltodextrin, polysorbate 80 & 65, and artificial flavorings. Those kind of ingredients belong in a chemist's lab, not in my family's mouths. The solution? Gotta make some homemade fudge pops. A lot of the homemade fudgesicle recipes I came across either were made with pudding mix or had corn syrup or cornstarch in them. The corn syrup helps the pops not to become too icy, but I found that agave syrup works just as well. As for the pops made with pudding mix, I am sure they taste really good, but pudding mix is just cocoa powder with lots of junk mixed in- just the thing I was trying to avoid. Plus, I was trying to make a fudge popsicle entirely from scratch, so those were out. I think you will find these fudgesicles creamier than any of their grocery counterparts and they are so easy to make.
I let Jayden be the first to sample them, since he helped me make them the day before and was impatiently waiting for them to harden up in the freezer overnight. I knew he would love them, what three year old wouldn't love a frozen, chocolate popsicle on a warm summer afternoon? He graciously allowed me to have a bite, although he said it needed to be a "very small one mom", and I must admit I thought about those pops for the rest of the day. I could hardly wait until after dinner to indulge myself. Sinfully creamy, perfectly fudgy, and adequately sweet, I will never buy fudge pops from a box again.
Fudge Popsicles
1 c skim milk ( I used 1%)
1 c heavy cream
1/2 c cocoa powder
2/3 c sugar
2 T agave syrup
1 t pure vanilla extract
Place milk, cream, cocoa, sugar, and agave in a heavy saucepan over medium heat. Bring slowly to a simmer, stirring frequently to dissolve cocoa powder and sugar. Do not let the mixture boil or it will scald. Remove from heat and stir in vanilla extract. Let mixture cool slightly before pouring into molds. Freeze for at least 4 hours, or overnight.
Pops can be stored for one week in freezer, but I doubt they will stick around that long! This recipe yielded 8 popsicles, though amount will vary depending on the size of your molds.
Wednesday, June 22, 2011
Brown Rice and Black Bean Salad
This post is titled brown rice and black bean salad because that's what I made last night, but you can use any whole grain that you have on hand. I've used quinoa, barley, and spelt in place of rice and all are fabulous. We all know that whole grains are essential to a healthy lifestyle but lots of people find it hard to incorporate them into their daily meals. My biggest dilemma is not incorporating them into my family's diet, but finding new and tasty ways to use them.
Like I've said before, our family eats a lot of Mexican food, and I always find myself struggling with what to serve alongside our favorite Mexican dishes- besides Spanish brown rice, which I've done a million times. This brown rice and black bean salad is nutritionally complete and substantial enough to eat on it's own, or wonderful as an accompaniment to enchiladas, tacos, or any other Mexican dish. With protein, fiber, and antioxidants to spare, it is not only palate pleasing, it really is a nutritional powerhouse. This salad is chock full of colorful, fresh veggies and lots of vibrant flavors. I toss it with my cilantro lime vinaigrette and it's so delectable I found myself eating a huge bowl for lunch the next day!
We're all trying to eat healthier and want things that are easy to prepare. This dish satisfies both of those needs. It couldn't be easier to assemble and it will leave you satiated without weighing you down. A perfect dish for vegetarians and carnivores alike! Ideal for these steamy summer nights, this dish is served cold, which means you can prepare it in advance. In fact it tastes better if it sits for a couple hours to allow the flavors to marry together.
Brown Rice and Black Bean Salad
2 C chicken broth
1 C brown rice ( I used Brown Basmati, but any whole grain will work- just cook according to package)
2 15 oz cans black beans, drained and rinsed
1 red bell pepper, diced
1 green bell pepper, diced
1 c red onion, diced (also good with green onions)
1/3 c chopped cilantro
1 jalapeno, seeded and minced
1 garlic clove, minced
2 teaspoons ground cumin
1 teaspoon chili powder
1/4 t cayenne pepper
salt and pepper
salt and pepper
Bring chicken broth to boil in large saucepan. Add rice. Bring to boil. Reduce heat to low, cover and simmer until liquid is absorbed, about 40 minutes.
Transfer rice to large bowl and fluff with fork. Mix in black beans, bell peppers, red onion, chopped cilantro, jalapeno, garlic, cumin, chili powder, and cayenne. Season salad to taste with salt and pepper. Pour vinaigrette dressing over salad and toss to combine. Salad can be made up to 1 day ahead, cover and refrigerate until ready to serve.
Subscribe to:
Posts (Atom)

