Real Food. Natural Beauty. Reviving traditional methods and nourishing the body from the inside out.
Monday, January 17, 2011
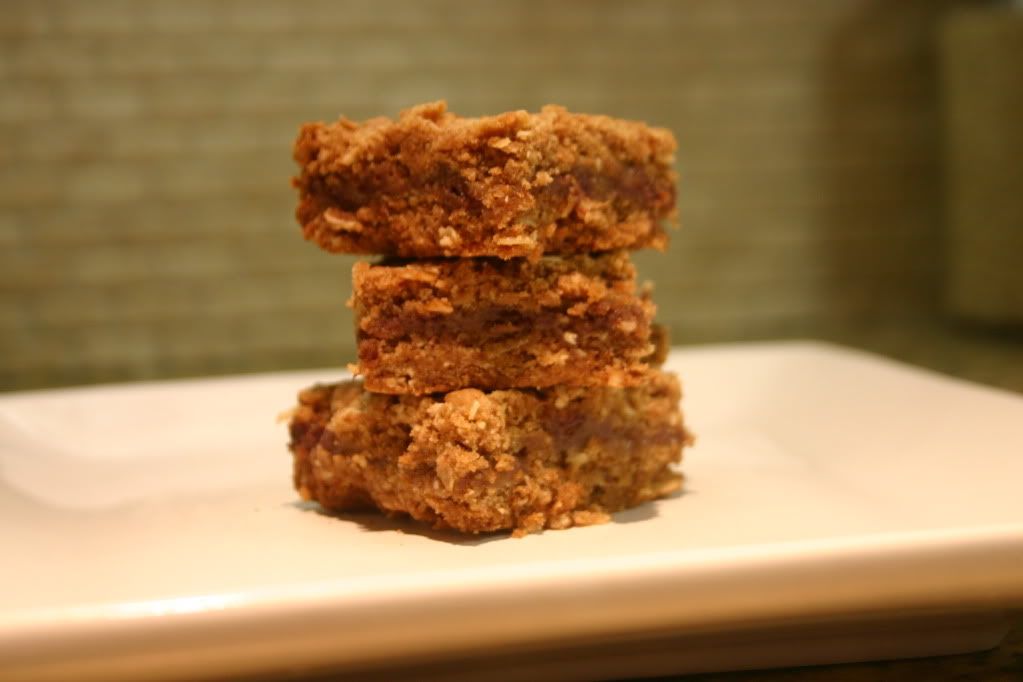
Date Bars
Truth be told, before I made these date bars, I had never tried a date in my life. I had been reading all about their health benefits, so I bought some for my son. I cut them lengthwise and filled them with cream cheese for his snack. I used them to sweeten recipes instead of sugar. Then I stumbled upon a date bar recipe and began tweaking it. They came out of the oven smelling divine, but I was a little hesitant to try them. See, I am all for making my son try new things, but I can be a bit reluctant at times. I had tried his cream cheese filled dates and was not thrilled. They were way too sweet and had a strange texture. Still, I was up for the challenge as these bars did smell quite scrumptious.
Okay, if we're being totally honest here, I had Jayden try them first. I have a bad habit of making him the guinea pig. He took one bite. And then another. He looked at me and said "deese are dood mommy". Translation: these are good! I summoned up my courage and grabbed a bar. I took a small bite and was pleasantly surprised. The date flavor was mellow and sweet. The oats made for a chewy, crumby topping. I was converted! I may not eat dates by the handful, but I will gladly eat a date bar anytime.
Dates are rich in iron and vitamins and minerals. They are often referred to as nature's candy and can be used to sweeten desserts and drinks. They can be a wonderful addition to smoothies and of course are great in baked goods like muffins and these bars.
Date Bars
1 1/2 c water
1 1/2 c chopped, pitted dates
1 t vanilla
1 c unbleached, all-purpose flour
1/2 c whole wheat flour
1 c packed brown sugar
1 c old-fashioned oats
1 1/2 t cinnamon
1/2 t baking soda
1/2 t salt
3/4 c room temperature unsalted butter, diced
Preheat oven to 350.
Grease a 8x8 pan and set aside.
Simmer 1/2 c water and dates for 10 minutes. Let cool and add in vanilla.
Combine flours sugar, oats, cinnamon, baking soda, and salt in a large bowl. Add diced butter and rub between hands until moist clumps form.
Press half of the oat mixture into pan. Spread dates over and then sprinkle the rest of the oat mixture on top. Press down slightly.
Bake 40 minutes. Cool on rack and cut into bars.
Tuesday, January 11, 2011
Whole Wheat Buttermilk Waffles
My waffle iron is probably the least used kitchen appliance I own. I love waffles, and I make pancakes all the time, but for some reason I don't pull out the waffle maker all that often. We recently celebrated my husband's grandma's 87th birthday, and the whole family got together to have lunch and celebrate with her. Her request for lunch? Nothing other than her favorite meal- waffles. She loves hers with whipped cream and strawberries. That got me thinking, I needed to dust off the ol' waffle maker and start cranking out some warm, crispy waffles.
So this Saturday morning, I rolled out of bed and made my way downstairs. I could hardly wait to sink my teeth into some crunchy, fluffy waffles. My husband and son were both surprised to hear that we were having waffles for breakfast. Jayden and I got to sample them first since hubby was taking his sweet time this morning. One bite and I knew my waffle maker would be getting alot more use. They were heavenly. Crispy and fluffy- they had just the right texture. I drizzled mine with pure maple syrup and thoroughly enjoyed every crunchy, sweet bite.
I know alot of you don't think there is enough time in the morning to make a homemade breakfast. That couldn't be further from the truth. The trick is to plan ahead. I mix the dry ingredients together the night before, that way all I have to do in the morning is add the wet ingredients and fire up the waffle maker. You can have fresh, tasty waffles in 10 minutes or less. These freeze well so they are great for those rushed mornings when you need a really quick breakfast. Just pop one in the toaster on the low setting and you'll have breakfast ready in no time.
Whole Wheat Buttermilk Waffles
1 1/2 c unbleached, all-purpose flour
1/2 c whole wheat flour
2 T sugar
2 t non-aluminum baking powder
1 t baking soda
3/4 t salt
2 c well-shaken buttermilk
6 T unsalted butter, melted and cooled to room temperature
2 large eggs
Vegetable oil or spray for waffle iron
Whisk together flour, sugar, baking powder, baking soda, and salt in a large bowl.
Shake buttermilk well and pour into another bowl. Add melted butter and eggs and whisk until combined.
Add buttermilk mixture to flour mix and whisk just until combined, don't overmix batter.
Spray or brush oil onto hot waffle iron and add 1/2 cup of batter into each waffle mold. Cook waffles according to manufacturer's instructions until golden and cooked through, about 3 minutes. Transfer cooked waffles to a rack in the oven to keep warm.
If not using a belgian waffle maker, use 1/3 c waffle mix for each mold.
Tuesday, December 28, 2010
The Wonders of Witch Hazel
The wondrous witch hazel. One of nature's most powerful healers. Witch hazel, or Hamamelis, is a low growing shrub native to North America. It has been used for thousands of years to treat everything from inflammation, to laryngitis, and is shown to speed recovery from bumps and bruises. The entire witch hazel plant, including the bark, leaves, and twigs are all high in tannins, which are responsible for the astringent properties of this plant. Astringents are used to tighten and harden tissues, making witch hazel highly effective at tightening pores and removing excess oil. Witch hazel contains flavonoids and procyanadins which contribute to its anti-inflammatory properties, making it helpful in relieving pain from hemorrhoids and varicose veins as well.
I first learned of the healing ability of the all mighty witch hazel quite some years ago, but it wasn't until recently that I put it to good use. After the birth of my son, I started experiencing breakouts, especially at that magical time of the month. Here I was, in my early 30's, dealing with my first wrinkles and now I had to worry about pimples too? I thought those were supposed to be saved for the lucky adolescents and pre-puberty crowd. But no, as cruel luck would have it, I was stuck dealing with fine lines AND pimples. It was embarrassing to say the least.
In this society, we have a pill for virtually every ailment. While some conditions do require a visit to the doctor, there are many that benefit most from nature's cures. When I started looking for an all natural cure for my annoying problem, I knew it would most likely come from a plant, not the dermatologist. Enter witch hazel. It was shown to treat a variety of conditions, most recognized was its ability to treat problematic skin. I began using it regularly, once a day after I washed my face and I was astounded with the results. My skin was clear without feeling dry. Witch hazel is known for its gentle cleansing properties, so it can reduce breakouts without stripping the skin. Once again, Mother Nature has done what she does best- provides. No toxins, no chemicals, no labs required. Just pure, natural relief. Read on to find more uses for this all natural, inexpensive liquid.
Blemish and spot control
This is the remedy Witch Hazel is most known for. Naturally and quickly helps clear up problem skin without over drying. Apply to a clean cotton ball and wipe over entire face. Can also be dabbed on pimples to facilitate the healing process.
Speed healing of bruises and swelling
Witch hazel has been proven effective in reducing the healing time of bruises and bumps. The reason? It constricts blood vessels, helping to reduce swelling. Soak a cloth in witch hazel and apply to affected area twice a day.
Treat Diaper Rash
Baby's diaper rash hanging around longer than you want it to? Looking for an all natural remedy? Try witch hazel. Apply to cloth or cotton ball and dab on affected area, and you will see immediate results.
Varicose Vein Relief
Witch hazel has been shown to reduce the pain associated with varicose veins by shrinking blood vessels. Soak a lint bandage in witch hazel and apply to area. Some studies show witch hazel to be effective in treating spider veins as well.
Shrink Bags Under The Eyes
Stayed up too late last night? Got bags under your eyes? Soak a cotton ball in witch hazel and apply to under eye are for 5 minutes, taking care not to get solution in your eye.
Soothe and Reduce External Hemorrhoids
Witch hazel not only tightens skin, but it provides anti-itch relief as well. It has been used to treat hemorrhoids naturally and quickly. Many over the counter products contain witch hazel in them. Combine witch hazel with aloe or petroleum jelly and apply to external hemorrhoids and you will significantly reduce itching.
Soothe Chicken Pox Blisters
To soothe painful chicken pox blisters, soak area in vessel filled with witch hazel. You can also soak a cloth in witch hazel and lay over affected areas. Witch hazel can also be combined with honey, a few essential oils, and aloe vera gel to make a spray that will not only reduce the itching associated with chicken pox, but also help to dry the blisters quickly.
1 T honey
15 drops lemon essential oil
30 drops lavender essential oil
15 drops bergamot essential oil
1/2 c aloe vera gel
Mix all these together and then add 1/2 c distilled witch hazel and mix again. Pour into a spray bottle and use on affected areas, avoiding eyes.
Soothe and Prevent Razor Burn
The anti-inflammatory properties of witch hazel make it great for soothing razor burn. It not only alleviates the burning sensation but speeds healing time as well. Apply to cotton ball and wipe over affected areas.
Speed Healing of Cuts and Bruises
Witch hazel is not only an anti-inflammatory and astrigent. It is also an antiseptic and has been referred to as nature's Neosporin. Witch hazel can be applied to minor cuts to cleanse, provide protection from infection, and encourage rapid healing. For bruising, witch hazel reduces swelling and speeds recovery time. Apply to a cloth or bathe area in witch hazel.
Soothe a Sunburn
Witch hazel is known for its skin soothing abilities. It can be very helpful in alleviating the pain associated with a sunburn. It provides long lasting anti-inflammatory relief and is one of the most effective home sunburn remedies. Soak a cloth with witch hazel and apply to sunburned area.
Heal Bug Bites
Again, witch hazel's anti-itch and anti-inflammatory abilities make it a great choice for soothing irritating bug bites. Apply with a cotton ball to relieve itching from mosquito bites, bee stings, and other bug bites. Provides immediate relief from the itching and swelling.
Refresh Tired, Red Eyes
Maybe you're a sleep deprived new mom, or just had a long crying spell. No doubt your red, puffy eyes tell the story. Apply witch hazel and cold water to a cloth and apply over eyes for 10 minutes to experience soothing relief.
Other uses for witch hazel include helping soothe dry skin, healing rashes from poison ivy and oak, and witch hazel can also be used in homemade deodorant.
I first learned of the healing ability of the all mighty witch hazel quite some years ago, but it wasn't until recently that I put it to good use. After the birth of my son, I started experiencing breakouts, especially at that magical time of the month. Here I was, in my early 30's, dealing with my first wrinkles and now I had to worry about pimples too? I thought those were supposed to be saved for the lucky adolescents and pre-puberty crowd. But no, as cruel luck would have it, I was stuck dealing with fine lines AND pimples. It was embarrassing to say the least.
In this society, we have a pill for virtually every ailment. While some conditions do require a visit to the doctor, there are many that benefit most from nature's cures. When I started looking for an all natural cure for my annoying problem, I knew it would most likely come from a plant, not the dermatologist. Enter witch hazel. It was shown to treat a variety of conditions, most recognized was its ability to treat problematic skin. I began using it regularly, once a day after I washed my face and I was astounded with the results. My skin was clear without feeling dry. Witch hazel is known for its gentle cleansing properties, so it can reduce breakouts without stripping the skin. Once again, Mother Nature has done what she does best- provides. No toxins, no chemicals, no labs required. Just pure, natural relief. Read on to find more uses for this all natural, inexpensive liquid.
Blemish and spot control
This is the remedy Witch Hazel is most known for. Naturally and quickly helps clear up problem skin without over drying. Apply to a clean cotton ball and wipe over entire face. Can also be dabbed on pimples to facilitate the healing process.
Speed healing of bruises and swelling
Witch hazel has been proven effective in reducing the healing time of bruises and bumps. The reason? It constricts blood vessels, helping to reduce swelling. Soak a cloth in witch hazel and apply to affected area twice a day.
Treat Diaper Rash
Baby's diaper rash hanging around longer than you want it to? Looking for an all natural remedy? Try witch hazel. Apply to cloth or cotton ball and dab on affected area, and you will see immediate results.
Varicose Vein Relief
Witch hazel has been shown to reduce the pain associated with varicose veins by shrinking blood vessels. Soak a lint bandage in witch hazel and apply to area. Some studies show witch hazel to be effective in treating spider veins as well.
Shrink Bags Under The Eyes
Stayed up too late last night? Got bags under your eyes? Soak a cotton ball in witch hazel and apply to under eye are for 5 minutes, taking care not to get solution in your eye.
Soothe and Reduce External Hemorrhoids
Witch hazel not only tightens skin, but it provides anti-itch relief as well. It has been used to treat hemorrhoids naturally and quickly. Many over the counter products contain witch hazel in them. Combine witch hazel with aloe or petroleum jelly and apply to external hemorrhoids and you will significantly reduce itching.
Soothe Chicken Pox Blisters
To soothe painful chicken pox blisters, soak area in vessel filled with witch hazel. You can also soak a cloth in witch hazel and lay over affected areas. Witch hazel can also be combined with honey, a few essential oils, and aloe vera gel to make a spray that will not only reduce the itching associated with chicken pox, but also help to dry the blisters quickly.
1 T honey
15 drops lemon essential oil
30 drops lavender essential oil
15 drops bergamot essential oil
1/2 c aloe vera gel
Mix all these together and then add 1/2 c distilled witch hazel and mix again. Pour into a spray bottle and use on affected areas, avoiding eyes.
Soothe and Prevent Razor Burn
The anti-inflammatory properties of witch hazel make it great for soothing razor burn. It not only alleviates the burning sensation but speeds healing time as well. Apply to cotton ball and wipe over affected areas.
Speed Healing of Cuts and Bruises
Witch hazel is not only an anti-inflammatory and astrigent. It is also an antiseptic and has been referred to as nature's Neosporin. Witch hazel can be applied to minor cuts to cleanse, provide protection from infection, and encourage rapid healing. For bruising, witch hazel reduces swelling and speeds recovery time. Apply to a cloth or bathe area in witch hazel.
Soothe a Sunburn
Witch hazel is known for its skin soothing abilities. It can be very helpful in alleviating the pain associated with a sunburn. It provides long lasting anti-inflammatory relief and is one of the most effective home sunburn remedies. Soak a cloth with witch hazel and apply to sunburned area.
Heal Bug Bites
Again, witch hazel's anti-itch and anti-inflammatory abilities make it a great choice for soothing irritating bug bites. Apply with a cotton ball to relieve itching from mosquito bites, bee stings, and other bug bites. Provides immediate relief from the itching and swelling.
Refresh Tired, Red Eyes
Maybe you're a sleep deprived new mom, or just had a long crying spell. No doubt your red, puffy eyes tell the story. Apply witch hazel and cold water to a cloth and apply over eyes for 10 minutes to experience soothing relief.
Other uses for witch hazel include helping soothe dry skin, healing rashes from poison ivy and oak, and witch hazel can also be used in homemade deodorant.
Sunday, December 19, 2010
Romanesco Salad
I know what you're saying. Roma- what? Romanesco. Also known as Roman cauliflower. The name may not be familiar, but it's flavor profile will be. It tastes like a cross between broccoli and cauliflower, but a bit more delicate than either. It is the edible flower of the species Brassica oleracea. It is available only for a brief time of the year, between September and December. It is easily the most stunning vegetable I have ever seen. A whole head of romanesco looks like something out of an art museum.
I blanched the romanesco and paired it with crunchy carrots, crisp cucumber, and bright red pepper for a healthy, refreshing, and beautiful salad. The dressing is inspired from a cucumber dish I love called Sunomono. The acidity from the rice vinegar and the sweetness from agave nectar pair beautifully with these veggies. Serve this salad as a side to any Asian cuisine or alone as a healthy, nutrient packed snack.
Romanesco- a relative of broccoli and cauliflower, it subsequently contains most of the vitamins and minerals found in them. It has high levels of vitamin C, fiber, and potassium. It cooks up beautifully when steamed, just take care to not overcook it, as it can become mushy. Usually it will steam to al dente in 4-5 minutes. It is a marvel for the eyes, no doubt the most intricate and beautiful vegetable on the planet.
Romanesco Salad
1 head romanesco, cut into florets
1 bunch carrots, sliced thin on the diagonal
1 cucumber, cut in half lengthwise, peeled, de-seeded and cut into half moons
1 red bell pepper, minced
1/4 c thin sliced red onion
3 T chopped cilantro
Dressing:
4 T rice vinegar
2 T peanut oil
1 garlic clove, minced
1 t fresh ginger, minced
3 T agave nectar
1/2 t salt
1/4 t white pepper
Prepare the dressing by whisking the ingredients together in a non-reactive bowl. Taste and adjust the seasoning if necessary. Set aside.
Blanch the romanesco in boiling water for 1-2 minutes. Immediately transfer to a bowl filled with ice and water to stop the cooking process. Drain well.
Put romanesco, carrots, cucumbers, onion, and bell pepper to a bowl and pour dressing over them. Toss well, making sure all the veggies get coated with the dressing.
This salad is best if prepared several hours before you want to serve it, allowing the vegetables to marinate in the dressing.
Stir in cilantro just before serving.
Thursday, December 16, 2010
Oatmeal Chocolate Chip Cookies
I wasn't kidding when I said I was in the midst of a cookie baking frenzy. So far this week I've made ten batches of cookies, and these here my friends, are the indisputable champion. These oatmeal chocolate chip cookies have won the hearts of many over the last few years. The secret to their unworldly goodness is the ground oats. It gives them a chewy, irresistible texture. Add chocolate to them and they really are the ultimate cookie.
Some people will argue that nothing can beat the classic chocolate chip cookie. Maybe not, but only if you've never tried these. Not only do they taste better, and have a superior texture, the addition of oats ups the health quotient considerably. Oats are one of the most nutritious foods on the planet, and baked into these cookies, well, they are just plain heavenly. Don't get me wrong, these are still cookies, and should be enjoyed in moderation (if you can muster the willpower!) but I am satisfied knowing that they are more nutritious than most of their cookie counterparts. These oatmeal chocolate chip cookies are requested more than any other I make and once you bake a batch, you will understand why.
Oatmeal Chocolate Chip Cookies
1 1/2 c old fashioned oats
2 c flour
1 t non-aluminum baking powder
1 t baking soda
1 t salt
2 sticks unsalted butter, room temperature
1 c sugar
1 c packed brown sugar
1 T vanilla
2 free range, organic eggs, room temperature
12 oz. mini chocolate chips
Pulse 1 c of the oats in a food processor until fine. Mix ground oats, remaining 1/2 c whole oats, flour, baking powder, baking soda, and salt in a large mixing bowl.
Using a Kitchenaid or handheld mixer, beat butter and sugars until fluffy. Add vanilla. Add eggs, one at a time and mix until incorporated. Gradually add flour mixture and mix until combined. Fold in chocolate chips.
Cover and chill 2 hours.
Preheat oven to 325. Roll dough into walnut sized balls and place 2 inches apart on a baking sheet lined with a Silpat.
Cook 15 minutes. Cool on racks.
The Perfect Molasses Cookie
Ahh yes, I have entered into the crazy, blissful state that is Christmas cookie baking. There is nothing I look forward to more during the holidays than baking goodies with my loved ones. Usually I do all my baking with my mom, but since she couldn't join me today, I baked these cookies with my son and his little buddy. Albeit a little messy, (as cooking with two year olds can be), it was a joyful experience nonetheless.
Growing up, I had the consummate grandma. She, like many other grammies, knew how to cook and bake everything perfectly. Her fudge was the fudgiest, her cakes the fluffiest, her homemade bread so delectable. I remember how she would laugh as she talked about "spanking the bread dough so it would grow up right". Silly ol' Gram T. Even as the years passed and our family became smaller, she always put out an impressive feast for us, enough to feed an army, I used to joke. She was a woman who wore many hats, and excelled at each one. Selfless, humble, quirky, strong, caring, and peaceful, she truly was a remarkable woman.
I used to park myself in the kitchen and just watch her make her magic. I remember with fervor the sights and sounds of her kitchen. It was like an orchestra, the sound of bacon crackling, the constant thud of her wooden spoon against the bowl, the warmth of the oven, the tantalizing aromas drifting about, it seems like only yesterday. I learned many things from my Gram T, and can only hope I turned out to be a glimmer of the woman she was. One of the greatest things she taught me was to put family before everything else and to make as many memories together as time would allow. She showed her love in a multitude of ways, none more sweet than through her cooking.
She was the master of cookies. She made every kind and she made them well. Chocolate chip, oatmeal raisin, peanut butter, and molasses. I knew if we were going to Gram's, she would have a plate of fresh baked cookies waiting. She even made an extra batch of cookies without nuts especially for me because she knew that's how I liked them. I don't know where she managed to find the time to make a special batch just for me, but she always did. Just one of the perks of being the granddaughter of this amazing woman.
It's been over a decade since she's been gone, fifteen years to be exact. Seems hard to believe. Every time I step into the kitchen I am reminded of her. Every batch of cookies I pull out of the oven makes her spirit shine a little brighter. Thankfully, my mom and I have slipped into her role, baking and cooking together as much as we can. Sometimes, when mom and I are in the kitchen, and I'm enveloped by the sights and smells of the season, I can feel her presence and I know she's looking at us... and she is proud.
Molasses Cookies
3/4 c butter, melted
1/2 c white sugar
1/2 c packed brown sugar
1 organic, free range egg
1/3 c unsulphured molasses
1 1/2 c all purpose flour
1/2 c whole wheat flour
2 t baking soda
1/2 t salt
1 t ground cinnamon
1/2 t ground cloves
3/4 t ground ginger
1/2 c white sugar
In a medium bowl, mix together the melted butter, sugars, and egg until smooth. Stir in the molasses. Combine the flours, baking soda, salt, cinnamon, cloves, and ginger; blend into the molasses mixture. Cover bowl and chill for one hour.
Preheat oven to 375 . Roll dough into walnut sized balls, and roll in the remaining white sugar. Place cookies 2 inches apart onto baking sheets lined with a Silpat.
Bake for 8 to 10 minutes, until tops are cracked. Cool on wire racks.
These are even better the next day!
Thursday, December 9, 2010
Chicken Tortilla Soup
Chicken tortilla soup. This one has to be my all time favorite, which is no small feat because there are quite a few soups in the running for that title. This one just has it all. It has all the familiar flavor profiles of Mexican food, which just happens to be my family's favorite cuisine. This soup is hearty and filling without being overloaded with fat or carbs.
I've tried countless tortilla soup recipes over the years, and it wasn't until I combined about six different recipes that I finally found my soup. I took the best components from each one, married them together, and found perfection. I think you'll agree, this soup is divine. I am sure it will find its way into your dinner rotation in no time!
Chicken Tortilla Soup
3-4 organic, free range chicken breasts
32 oz. organic chicken stock ( I use Pacific Natural Foods Low Sodium)
3 c water
2 c cilantro stems and sprigs- tied with kitchen twine, plus 3 T chopped cilantro
2 T vegetable oil
1 yellow onion, diced
1 each red and green bell pepper, diced
2 garlic cloves, minced
1 jalapeno, seeded, cored, and diced
1/2 t ground cumin
1/2 t chili powder
1/2 t ground cumin
1/2 t chili powder
1 can organic black beans, drained
1 can organic fire roasted tomatoes ( I used Muir Glen)
salt and pepper
8 corn tortillas cut in 1/4 inch strips
Toppings:
1 avocado, diced
4 green onions, sliced
shredded cheese ( I used pepperjack)
sour cream
cilantro
Preheat oven to 375. Place tortilla strips on baking sheet and toss with 1 T oil and sprinkle with salt. Bake until golden and crispy, about 14 minutes, turning a few times to ensure even cooking.
In a large stock pot, combine chicken, cilantro bundle, stock, and water. Bring to a boil, reduce heat, and simmer until chicken is cooked through- about 10 minutes. Transfer chicken to a plate and let cool. Dice or shred chicken when cool enough to handle. Remove cilantro bundle and strain broth through a strainer lined with cheesecloth. Pour broth back in pan and turn heat to low.
While chicken is poaching, heat remaining tablespoon oil in a large saucepan. Add onion, bell peppers, jalapeno, garlic, cumin, and chili powder and cook over medium heat until veggies begin to soften, about 6 minutes. Add beans and tomatoes and cook 1 minute more. Season with salt and pepper.
Transfer half of veggie mixture into blender or food processor along with a ladle full of reserved broth. Blend until smooth.
Add both veggies mixtures into broth. Add chicken back in and simmer 5 minutes. Season with salt and pepper to taste.
Ladle soup into bowls. Garnish with tortilla strips, cilantro, cheese, avocado and green onion. Serve and enjoy immediately!
* The broth and poached chicken can be done up to a day ahead, refrigerate until ready to use.
Subscribe to:
Posts (Atom)