Friday, October 7, 2011

Whole Wheat Pumpkin Waffles


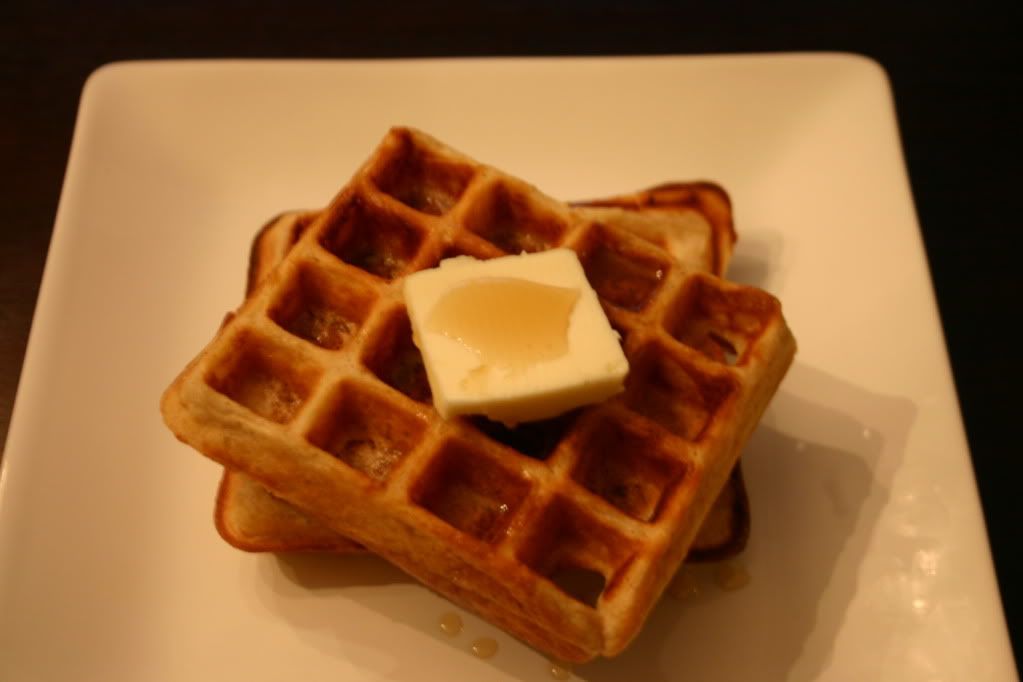
I derive lots of pleasure from making my family a wholesome breakfast.  This is the time of year I really start cranking out the pancakes and waffles.  Being the holiday obsessed woman that I am, my meals have to include a little seasonal flair from time to time.  On today's menu?  Pumpkin waffles.  Wholesome, nutritious, festive, and delicious, plus they make the whole kitchen smell like pumpkin pie!   You can make a batch of these on the weekend, and you'll have plenty of waffles to freeze and pop in the toaster for a quick morning meal.   The leftovers can be used to make a quick, nutritious lunch as well.  Just toast and let cool slightly, then spread with cream cheese and cut into little sandwiches.  Jayden loves when we get to have waffles for lunch!

Whenever breakfast includes a veggie, I get a little excited.  Pathetic, right?  Excitement over a serving of vegetables?  Hey, when you're a mom, you get where you can.  Since we have a green smoothie every morning, this means my son is getting TWO servings of veggies first thing in the morning.  That's pretty good for a three year old, most adults I know don't get that in a day!!  Seeing that fall has finally arrived,  I have a ton of canned pumpkin puree in the pantry.  I like to stock up on it at Trader Joe's while they have it.  It is one of those seasonal items that can go a long way in the kitchen.  We mix it in our oatmeal, add it to cookie recipes, and of course, make pumpkin waffles!

* Time saver tip:  Sift together the dry ingredients the night before, that way in the morning all you have to do is add the wet ingredients and start pumping out the pumpkin waffles!  You'll have breakfast on the table in 10 minutes!


Whole Wheat Pumpkin Waffles

1 c unbleached, all purpose flour
1 1/2 c whole wheat flour
2 1/2 t Baking Powder
1 t Baking Soda
1/2 t Salt
2 t Ground Cinnamon
1/4 t Ground Ginger

1/4 c brown sugar
4 Eggs
1 C Milk 

1 Cup Buttermilk
1 C Pumpkin Puree
 5 T Butter, melted and cooled


 Preheat waffle iron.

Sift first 7 ingredients into a bowl.


Whisk in brown sugar into rest of dry ingredients.


 In a separate bowl whisk the remaining ingredients.

Whisk the dry ingredients into the liquid mixture and whisk until smooth.


Pour about 1/2 cup of the pumpkin batter into a waffle iron that’s been buttered or     greased and cook according to manufacturer’s directions.

  Serve with maple syrup or dust with powdered sugar.

*Allow to cool, place in a Ziploc bag, label and freeze. When ready, place in toaster or oven at 300 and heat for 10 minutes or until heated through.

Thursday, September 1, 2011

No Bake Brown Rice and Oat Crispy Treats


I am always on a quest to find treats that I can feel good about feeding to my family.  I admittedly have a HUGE sweet tooth, and I love when I find recipes that I too can indulge in without feeling guilty.  Rice crispy treats have been a favorite of mine since I was a kid.  I love the texture and the taste.  But refined cereal and gooey marshmallows don't necessarily fit into my nutrition mantra.  I've managed to make them healthier over the years by using brown rice cereal and adding ground flax and they were delicious as well as much more nutritious.  This time I wanted to up the nutrition value even more so I added oats and peanut butter.  The result- a cross between an chewy granola bar and a rice crispy treat.  Can you say yum????  And don't forget, these bars may taste and look like dessert but they are full of omega 3 fatty acids, protein, fiber, and a whole slough of vitamins and minerals.  Tastes good.  Good for you.  That's my goal with everything I make.

These are a great treat to let the kids help with, Jayden did all the scooping, pouring and mixing.  Of course, quite a bit of the mixture found its way into his little mouth along the way, but what fun is cooking if you can't sample the goods?  Another reason these treats are a favorite of mine is because they are so easy to make and I don't have to turn on the oven.  I can whip up a batch in ten minutes, and being 41 weeks pregnant, (yes you read that right- 41 weeks!) I'll do anything if it can save me some time and doesn't require a lot of energy, because right now I'm short on both.  As you can see from the picture I added mini chocolate chips to this batch.  Normally I make them without, but since Jayden is about to become a big brother in a matter of days, I figured we could make an extra special treat this time. 

Brown Rice and Oat Crispy Treats

1 3/4 c oats  ( you can use rolled or quick cooking)
1 3/4 c brown rice cereal  ( I use Erehwon)
1/4 c ground flax seed
1/2 c honey, brown rice syrup, agave, or corn syrup  ( I use 1/4 c honey and 1/4 c brown rice syrup)
1/2 c brown sugar
1/2 natural peanut butter
1 t vanilla

Other variations to try:

1/4 c mini chocolate chips, put in freezer for 30 minutes before mixing in to prevent melting
1/2 c raisins
1/2 c chopped nuts or seeds

Lightly grease 11 x 7 inch pan. You can use a 13 x 9 but you will end up with a thinner bar.

In a large mixing bowl combine cereal, oats, and flax.

Combine honey, brown rice syrup, and brown sugar in a saucepan over medium heat.  Stir until mixture just comes to a boil.  Remove from heat and stir in peanut butter and vanilla.

Pour mixture over dry ingredients and mix well until combined.  If adding any additional ingredients, do so now. 

Transfer mixture to prepared pan and press mixture down evenly.


Put in refrigerator for an hour to set up.  After that, they can be stored at room temperature in an airtight container for a week.

Turn out onto a cutting board and cut into desired size bars.

Tuesday, July 12, 2011

Classic Lemonade


I don't know of any other drink as refreshing or tasty on a hot summer day than a big glass of frosty, cold lemonade.  Lemonade truly is the quintessential summer beverage, it's tangy and sour with just the perfect amount of sweetness.  Bright and cheery- it's sunshine in a glass.   I have been on a lemonade binge the last few weeks, ever since my mother-in-law shared this recipe with me.  I lost count of how many batches I've made, but it's somewhere around 20.  Of course, I am eight months pregnant, and I have been known to make and remake my favorite recipes over and over and over again but seriously, this lemonade is the best I have ever tasted.  As soon as I see that pitcher getting dangerously low, I have to start whipping up another batch.  The thought of being without a glass is just too much for me to bear.

I have to admit, when I first tried this at my mother-in-law's house, I was a bit skeptical.  She said it was the best lemonade she had ever tried and I wondered what was so special about this particular recipe.  I still don't know.  It only has three ingredients: lemons, sugar, and water.  The real beauty of it is that this recipe strikes the perfect balance between sour and sweet.  I have tried lots of lemonade recipes over the years, and this is by far the best.  The only change I made was adding some of the pulp to mine which gives it a little more lemony kick, which I enjoy.  This recipe takes less than ten minutes to make and will soon be your favorite summer drink.  Sure, popping open a can of frozen concentrate might save you five minutes, but will also fill you up with high fructose corn syrup.  Plus, there is nothing like fresh squeezed juice- it simply tastes better. 

Lemonade

1 c water
3/4 c granulated sugar
3/4 c fresh squeezed lemon juice (from approx. 6 lemons)
4 c cold water
lemon pulp

Place 1 c water and sugar into a small saucepan over medium heat.  Bring to a simmer and stir occasionally until sugar dissolves, about 3 minutes.  Set aside and let cool.

Juice lemons and strain to remove seeds and pulp.  At this point, I use a spoon to remove all the seeds and add remaining pulp to lemon juice.  Depending on the size and juiciness of your lemons, you may need more than six, but I find that is the average number it takes to yield 3/4 c.

Add lemon juice, pulp, simple syrup, and 4 c water to a large pitcher.  Stir well and chill thoroughly before enjoying. 

Thursday, June 23, 2011

Fudge Popsicles


Summer is in full swing around here.  We have spent every afternoon this week playing in the water.  Although an air-conditioned house is very appealing to me in my pregnant state, I can't keep my son inside for the life of me.  Everyday following nap time, he requests a rocket popsicle and the sprinklers turned on.  Yes, those rocket pops I posted a few days ago are a huge hit with him.  Ever since I made them and the weather turned freakishly hot, they are his favorite afternoon snack.  Normally, I wouldn't even think of letting him have a popsicle for a snack, but they are made with fresh fruit, and it's summer for goodness sake.  Summertime as a kid means getting to do special things, like staying up late, running through the sprinklers, and eating popsicles for a snack.  Rocket pops may rank high on his list,  just as they did when I was a kid, but as an adult, a new frozen treat has taken their place- the fudgesicle.  Creamy, rich, chocolaty, and oh so satisfying.  I love them because they are indulgent without being overly sweet.  They are the perfect treat to end the day with.   


I have tried almost all the Fudgesicles in the markets, and most are really good.  I merely wanted all that chocolaty goodness minus all the junk.  Look on the back of a box of your favorite fudge pops and you'll likely see a laundry list of ingredients including, sodium chloride, maltodextrin, polysorbate 80 & 65, and artificial flavorings.  Those kind of ingredients belong in a chemist's lab, not in my family's mouths.  The solution?  Gotta make some homemade fudge pops.  A lot of the homemade fudgesicle recipes I came across either were made with pudding mix or had corn syrup or cornstarch in them.  The corn syrup helps the pops not to become too icy, but I found that agave syrup works just as well.  As for the pops made with pudding mix, I am sure they taste really good, but pudding mix is just cocoa powder with lots of junk mixed in- just the thing I was trying to avoid.  Plus, I was trying to make a fudge popsicle entirely from scratch, so those were out.  I think you will find these fudgesicles creamier than any of their grocery counterparts and they are so easy to make. 


I let Jayden be the first to sample them, since he helped me make them the day before and was impatiently waiting for them to harden up in the freezer overnight.  I knew he would love them, what three year old wouldn't love a frozen, chocolate popsicle on a warm summer afternoon?  He graciously allowed me to have a bite, although he said it needed to be a "very small one mom", and I must admit I thought about those pops for the rest of the day.  I could hardly wait until after dinner to indulge myself.  Sinfully creamy, perfectly fudgy, and adequately sweet, I will never buy fudge pops from a box again.

Fudge Popsicles

1 c skim milk ( I used 1%)
1 c heavy cream
1/2 c cocoa powder
2/3 c sugar
2 T agave syrup
1 t pure vanilla extract

Place milk, cream, cocoa, sugar, and agave in a heavy saucepan over medium heat.  Bring slowly to a simmer, stirring frequently to dissolve cocoa powder and sugar.  Do not let the mixture boil or it will scald.  Remove from heat and stir in vanilla extract.  Let mixture cool slightly before pouring into molds.  Freeze for at least 4 hours, or overnight. 

Pops can be stored for one week in freezer, but I doubt they will stick around that long!  This recipe yielded 8 popsicles, though amount will vary depending on the size of your molds.

Wednesday, June 22, 2011

Brown Rice and Black Bean Salad


This post is titled brown rice and  black bean salad because that's what I made last night, but you can use any whole grain that you have on hand.  I've used quinoa, barley, and spelt in place of rice and all are fabulous.  We all know that whole grains are essential to a healthy lifestyle but lots of people find it hard to incorporate them into their daily meals.   My biggest dilemma is not incorporating them into my family's diet, but finding new and tasty ways to use them.

 Like I've said before, our family eats a lot of Mexican food, and I always find myself struggling with what to serve alongside our favorite Mexican dishes- besides Spanish brown rice, which I've done a million times.  This brown rice and black bean salad is nutritionally complete and substantial enough to eat on it's own, or wonderful as an accompaniment to enchiladas, tacos, or any other Mexican dish.  With protein, fiber, and antioxidants to spare, it is not only palate pleasing, it really is a nutritional powerhouse.  This salad is chock full of colorful, fresh veggies and lots of vibrant flavors.  I toss it with my cilantro lime vinaigrette and it's so delectable I found myself eating a huge bowl for lunch the next day!

We're all trying to eat healthier and want things that are easy to prepare.  This dish satisfies both of those needs.  It couldn't be easier to assemble and it will leave you satiated without weighing you down.  A perfect dish for vegetarians and carnivores alike!  Ideal for these steamy summer nights, this dish is served cold, which means you can prepare it in advance.  In fact it tastes better if it sits for a couple hours to allow the flavors to marry together. 

Brown Rice and Black Bean Salad


2 C chicken broth
1 C brown rice  ( I used Brown Basmati, but any whole grain will work- just cook according to package)

2 15 oz cans black beans, drained  and rinsed
1 red bell pepper, diced
1 green bell pepper, diced
1 c red onion, diced  (also good with green onions)
1/3 c chopped cilantro
1 jalapeno, seeded and minced
1 garlic clove, minced
2 teaspoons ground cumin
1 teaspoon chili powder
1/4 t cayenne pepper
salt and pepper

Bring chicken broth to boil in large saucepan. Add rice. Bring to boil. Reduce heat to low, cover and simmer until liquid is absorbed, about 40 minutes.

Transfer rice to large bowl and fluff with fork. Mix in black beans, bell peppers, red onion, chopped cilantro, jalapeno, garlic, cumin, chili powder, and cayenne. Season salad to taste with salt and pepper.  Pour vinaigrette dressing over salad and toss to combine.  Salad can be made up to 1 day ahead, cover and refrigerate until ready to serve.

Tuesday, June 21, 2011

Cilantro Lime Vinaigrette


It's official.  Today is the first day of summer.  Mother Nature definitely got the memo too.  It's a sweltering 101 degrees in Sacramento today.  Seven months pregnant, shuttling two rambunctious boys between gymnastics and the park this morning, I was reminded how brutal this summer was going to be.  By the time we got home, they still had energy to burn, yet I was struggling to find enough to put lunch together.  

Needless to say, by the time dinner rolls around, I am pretty much tapped out.  If I'm being totally honest, my energy isn't the only thing wearing thin by 5:00.  Carrying around a bowling ball in my stomach, chasing after a tireless three year old boy, while doing all the other million and one tasks a mother must do, all while enduring the oppressive heat,  have my patience at an all time low too.  So when I tell you that by the end of the day preparing dinner feels like a burden, that is the understatement of the century.

On Sundays, when I sit down to plan the meals for the week, easy is not only ideal, it is a requirement. During the long, hot days of summer I have a tendency to make a ton of salads for dinner.  They are quick, refreshing, and usually don't require turning on the oven.  This summer in particular, with swollen fingers and ankles, and the addition of lots of extra lbs, I am resorting more and more to salads.   As I've told you before, my family is nuts about Mexican food, so on salad night- you know there's going to be a Mexican inspired one.  Tonight's is a fajita salad, chock full of black beans, cabbage, red bell peppers, avocado, and a slough of other ingredients inherent in Mexican cuisine.  I often dress it with a scrumptious jalapeno ranch dressing, but I was in search of something much lighter.  Enter cilantro-lime vinaigrette.  I put cilantro and lime in the salad anyways, so it made perfect sense.  This is the end-all, be-all of vinaigrettes as far as I'm concerned.  I use it not only to dress salads, but as a marinade and sauce for chicken, shrimp, and grilled fish, and as a dressing on a whole grain and black bean side dish I make ( I will post that recipe tomorrow!).  It is delicious and versatile which makes it a perfect staple to add to your summer menus.

Cilantro- Lime Vinaigrette

1/4 c fresh squeezed lime juice ( no lime juice out of a squeeze bottle please!)
1/3 c chopped cilantro
1 T cumin
1 T honey
2 T rice wine vinegar
2 garlic cloves, minced
1/4 c extra virgin olive oil
1/4 c canola oil
salt and pepper

Place lime juice, cilantro, honey, vinegar, cumin, and garlic in food processor.  Blend until well mixed, then slowly stream in oil to emulsify dressing.  Add salt and pepper to taste.

Transfer dressing to a mason jar with a tight fitting lid and put in fridge where it will keep for 2-3 days.  Dressing tastes best if flavors are allowed to marry together for at least 30 minutes in refrigerator.  Before serving, shake well to combine if any separation occurs.


Friday, June 17, 2011

Rocket Pops


I don't think anyone would argue that summertime as a kid was one of the best times of your life.  Hot days at the beach, warm nights playing outside, not a worry in the world.  I have very fond memories of my summers as a kid, and now as a mom I get the pleasure of watching my son enjoy this glorious time of year.  When I was young, I loved hearing the loud, obnoxious tunes of the ice cream truck.  You could hear it from five blocks away, and me and all my friends would impatiently wait until he turned down our street.  We would all run to him, screaming, hoping he would see us and stop.  My favorite ice cream truck treat was without a doubt the bomb pops.  Red, white, and neon blue, and so darn good.  The red layer was my favorite so I was always sad that it was at the top.  Patriotic, festive, and delicious- they were the ultimate frozen treat.

Fast forward 25 years and I still love popsicles.  They have become one of my son's most requested treats as soon as the weather heats up.  I make him all kinds of frozen concoctions; yogurt popsicles, fruit pops, and homemade ice cream.  With Fourth of July right around the corner, my thoughts wandered back to the summers of my youth, and I knew I had to make him rocket popsicles.  One problem-  I wasn't about to give him the rocket pops I grew up on.  A huge heaping of corn syrup, plus a zillion dyes and additives- not the kind of food I want him eating.  But I wasn't about to deny him his favorite frozen treat on a stick either.  I had to recreate the rocket pop- make a healthier version, with some nutritional value, and no crazy additives.  I use fresh fruit in mine, full of antioxidants and vitamins, and while they might not be the brightly colored ones I remember from my youth, they are delicious and I can feel good about giving them to him.  Plus, he LOVES rocket ships, so you can imagine the look on his face when I pulled out a tri-colored popsicle in the shape of a rocket!  Oh ya, mom scored some points today!


Rocket Pops

Strawberry Layer
2 C fresh or frozen strawberries ( you can also use watermelon or raspberries)
3  T agave syrup or 1/4 c granulated sugar

Put strawberries and sweetener into food processor and blend until smooth.  If using frozen strawberries, let them sit out until slightly defrosted before blending in food processor.
Spoon strawberry mixture into popsicle molds ( you can also use paper cups) about 1/3 of the way up.  Freeze for 30-45 minutes.

Lemon Layer
1/2 C water
1/4 C sugar
1/2 C fresh squeezed lemon juice
1/4 C orange juice
1/4 t vanilla extract


Bring water and sugar to a boil in a medium saucepan over medium-high heat.  Stir until sugar is dissolved.  Remove from heat and add lemon juice, orange juice, and vanilla.  Let cool to room temperature.  Pour into molds over strawberry layer, about 2/3 way up the molds.  Freeze until almost frozen, about 30-45 minutes.


Blueberry Layer
2 C frozen blueberries, defrosted slightly
3 T agave syrup or 5 T sugar


Place blueberries and sweetener into food processor and blend until smooth.  Spoon over lemon layer, leaving a little room at the end of your molds, as the popsicles will expand slightly when frozen.  Place sticks in and freeze until solid.


I used Tovolo's Rocket popsicle molds, they are BPA free and have a great rocket shape but any rocket shaped mold will work, as will paper cups.  If using paper cups, just layer and freeze according to the recipe, then peel off the paper when you're ready to eat!  Because all molds are different, you may have some fruit purees leftover.  You can refrigerate the fruit purees and use them as a topping for yogurt, ice cream, oatmeal, or waffles.


Thursday, June 16, 2011

Breakfast Burritos


I am a very lucky woman.  My husband works extremely hard so that I am able to stay home with our son.  He has to get up at 4:45 in the morning and isn't home until after 6:00.  Not only does he work hard and long hours, but he has to commute on top of it.  Grateful and appreciative don't begin to describe how much I respect and admire the lengths he goes to to provide for our family.  That being said, as much as I appreciate and love him, I am NOT up at 4:45 preparing him a hot, nutritious meal to eat before he starts his day.  Not that I don't want to, it's just, well, that's a little early for me to play super wife.  That left me with a dilemma.  I know breakfast is the most important meal of the day, which is why I never fail to make my son and I a homemade, healthy meal every single morning.  Here we are enjoying hot steel cut oatmeal, omelets, pancakes, and green smoothies while hubby is left with a banana. 


For all that he does for us, didn't he deserve a little more to start his day?  I thought so and so I started experimenting.  He loves breakfast burritos, but I wasn't about to buy him some fat laden, preservative filled frozen ones.  And so began the quest to make the perfect breakfast burrito.  It had to be healthy, portable, and quick for him to heat in the morning.  I was a little worried about how the eggs and filling would hold up after being frozen and then microwaved but hubby says they are delicious!!

Breakfast Burritos

1 package bulk chicken, turkey, or pork breakfast sausage
10 eggs ( I use 7 eggs and 3 egg whites)
2 C breakfast potatoes ( I have made my own and used Ore Ida O'brien frozen potatoes- both are great, just depends on how much time I have and how motivated I am feeling...)
shredded cheese ( I use cheddar and pepperjack)
salsa
Sriracha hot sauce  ( or your favorite)
burrito size tortillas, flour or whole wheat

Cook sausage on medium-high until no longer pink and cooked through.

Scramble eggs in a large bowl, add salt and pepper and as much Sriracha as you like- I use about 3 T.  Cook until desired doneness is achieved.

In another pan, cook breakfast potatoes until golden and crispy.  If making your own, add bell peppers and onions.  Season with salt and pepper to taste.

While potatoes are cooking, shred cheeses.  Set aside.

Combine sausage, eggs, and potatoes together in large bowl.  Allow to cool completely in the fridge before assembling burritos.

Start with one tortilla at a time.  Add about 1/3 c sausage filling in lower half of tortilla.  Add 1 T salsa and top with cheese.  Fold burrito style and continue making burritos until you are done.  I can usually get 12-16 burritos from these ingredients.

Freeze burritos on a cookie sheet or plates until frozen.  Then individually wrap in foil and place in Ziploc bags. 

When ready to eat, remove foil and place a damp paper towel over burrito.  Hubby says they are perfectly cooked at 2 min on high in the microwave , but it may vary.

Wrap bottom half back in foil and enjoy!!!!

Friday, February 25, 2011

Stuffed Peppers


I suppose I should start off by explaining why it has been forever and a day since my last post.  Right around Christmas we learned we are expecting baby number two (Yay!!) and this pregnancy has already proven to be nothing like my first.  When I was pregnant with Jayden, I never got sick, I had an abundance of energy, and truly felt great for the majority of my pregnancy.  Fast forward three years, and nothing is the same.  Morning, afternoon, evening sickness, and the worst fatigue I've ever experienced.  Hubby says it's because I'm older now, isn't that sweet??  This coupled with an extra hectic month and you have the reason for my long hiatus.

It's only fitting that my first post in a long while is stuffed peppers, because that is what I feel like these days- a stuffed pepper.  Oh, didn't I mention that aside from being a more physically exhausting pregnancy, my second one also has me looking like I'm carrying quadruplets?  Oh ya, I got it all this time.  A few weeks ago, as I was approaching the 11 week mark, my wonderful hubby who always knows how to say the most comforting things, looked at me and said, " wow, you look like you did when you were 6 months pregnant with Jayden and you're only 3 months."  Thanks a lot babe, thanks a lot.  I guess he forgot how volatile a sickly pregnant woman can be- he was quickly reminded after that comment.

The other fun part of this pregnancy that I didn't get to experience with the first pregnancy is the aversions and cravings for certain foods.  My first time around, I never had those weird pregnancy cravings, nor did any food turn me off.  This time however, I am finding it harder to eat the way I know I should be.  Even my smoothies in the morning have a strange taste to them.  That being said, it has been a struggle to plan out our daily meals and I know hubby is getting sick of having Mexican food every night.  I have had to force myself to eat salad, which is usually my daily staple.  Food just tastes different to me right now.  Things I usually love I find unappetizing.  And the things that sound good are the foods I know I shouldn't be eating, ones I haven't had in years, like french fries. 

Luckily, there are times when healthy food actually sounds like something I can eat (and keep down!) and last night happened to be one of those nights.  These stuffed peppers are great because they have all the components of a healthful, nutritious meal; lean protein, whole grains, and veggies- all stuffed into one neat little package.  They are quick and easy to prepare, which has always been essential for me but is now critically important as my energy levels are at all time lows, especially by the time dinner comes around.  Traditionally, most stuffed pepper recipes call for ground beef or pork and white rice.  I use lean ground turkey and brown rice in mine to maximize the nutritional value.  These are delectable whether you're 3 months pregnant going on 8, or not...

Stuffed Peppers

6 green bell peppers, tops cut off and seeds removed
2 T vegetable oil
1 c finely chopped yellow onion
1/2 c finely chopped bell peppers  ( I used red and yellow)
1 lb ground turkey
1 T minced garlic
1/4 c chopped flat leaf parsley
1/2 t red pepper flakes  ( more or less depending on how spicy you like it, I used 2 t)
2 t salt
1 t pepper
2 c cooked brown rice  ( I use Trader Joe's Organic Microwavable Brown Rice)
8 oz tomato sauce
1/3 c grated parmesan
1/4 c grated mozzarella
water

Preheat oven to 350.

Bring a large pot of water to a boil.  Parboil the peppers until tender, about 2-3 minutes.  Remove with a spider or slotted spoon and drain upside down on paper towels.

In a large saute pan heat oil over medium high heat.  Add onions and chopped bell peppers and cook until soft, about 4 minutes.  Add turkey, garlic, parsley, red pepper flakes, salt, and pepper.  Cook until meat is browned, breaking up lumps with a wooden spoon or spatula, about 8 minutes.  Add the cooked rice, tomato sauce, and parmesan and stir.  Remove from heat and adjust the seasoning to your taste.  ( I always end up adding more salt and pepper).

Pour enough water into a baking dish to just cover the bottom about 1/8" deep.  Stuff the bell peppers with the meat mixture and place in baking dish.  Bake 20 -25 minutes and remove from oven.  Top with mozzarella cheese.  Put back in oven for 5-10 minutes until cheese is melted.

Remove from oven and let rest 10 minutes before serving.  Serve as is or with your favorite hot sauce.


*Note:
I sometimes use fire roasted tomatoes in place of the tomato sauce.  They lend a smoky flavor and a chunkier texture to the filling which I love.  Experiment using both and find your favorite!


Monday, January 17, 2011

Date Bars


Truth be told, before I made these date bars, I had never tried a date in my life.  I had been reading all about their health benefits, so I bought some for my son.  I cut them lengthwise and filled them with cream cheese for his snack.  I used them to sweeten recipes instead of sugar.  Then I stumbled upon a date bar recipe and began tweaking it.  They came out of the oven smelling divine, but I was a little hesitant to try them.  See, I am all for making my son try new things, but I can be a bit reluctant at times.  I had tried his cream cheese filled dates and was not thrilled.  They were way too sweet and had a strange texture.  Still, I was up for the challenge as these bars did smell quite scrumptious.

Okay, if we're being totally honest here, I had Jayden try them first.  I have a bad habit of making him the guinea pig.  He took one bite.  And then another.  He looked at me and said "deese are dood mommy".  Translation: these are good!  I summoned up my courage and grabbed a bar.  I took a small bite and was pleasantly surprised.  The date flavor was mellow and sweet.  The oats made for a chewy, crumby topping.  I was converted!  I may not eat dates by the handful, but I will gladly eat a date bar anytime. 

Dates are rich in iron and vitamins and minerals.  They are often referred to as nature's candy and can be used to sweeten desserts and drinks.  They can be a wonderful addition to smoothies and of course are great in baked goods like muffins and these bars.

Date Bars

1 1/2 c water
1 1/2 c chopped, pitted dates
1 t vanilla

1 c unbleached, all-purpose flour
1/2 c whole wheat flour
1 c packed brown sugar
1 c old-fashioned oats
1 1/2 t cinnamon
1/2 t baking soda
1/2 t salt
3/4 c room temperature unsalted butter, diced

Preheat oven to 350.

Grease a 8x8 pan and set aside.

Simmer 1/2 c water and dates for 10 minutes.  Let cool and add in vanilla.

Combine flours sugar, oats, cinnamon, baking soda, and salt in a large bowl.  Add diced butter and rub between hands until moist clumps form. 

Press half of the oat mixture into pan.  Spread dates over and then sprinkle the rest of the oat mixture on top.  Press down slightly.

Bake 40 minutes.  Cool on rack and cut into bars.

Tuesday, January 11, 2011

Whole Wheat Buttermilk Waffles


My waffle iron is probably the least used kitchen appliance I own.  I love waffles, and I make pancakes all the time, but for some reason I don't pull out the waffle maker all that often.  We recently celebrated my husband's grandma's 87th birthday, and the whole family got together to have lunch and celebrate with her.  Her request for lunch?  Nothing other than her favorite meal- waffles.  She loves hers with whipped cream and strawberries.  That got me thinking, I needed to dust off the ol' waffle maker and start cranking out some warm, crispy waffles.

So this Saturday morning, I rolled out of bed and made my way downstairs.  I could hardly wait to sink my teeth into some crunchy, fluffy waffles.  My husband and son were both surprised to hear that we were having waffles for breakfast.  Jayden and I got to sample them first since hubby was taking his sweet time this morning.  One bite and I knew my waffle maker would be getting alot more use.  They were heavenly.  Crispy and fluffy- they had just the right texture.  I drizzled mine with pure maple syrup and thoroughly enjoyed every crunchy, sweet bite. 

I know alot of you don't think there is enough time in the morning to make a homemade breakfast.  That couldn't be further from the truth.  The trick is to plan ahead.  I mix the dry ingredients together the night before, that way all I have to do in the morning is add the wet ingredients and fire up the waffle maker.  You can have fresh, tasty waffles in 10 minutes or less.  These freeze well so they are great for those rushed mornings when you need a really quick breakfast.  Just pop one in the toaster on the low setting and you'll have breakfast ready in no time. 


Whole Wheat Buttermilk Waffles

1 1/2 c unbleached, all-purpose flour
1/2 c whole wheat flour
2 T sugar
2 t non-aluminum baking powder
1 t baking soda
3/4 t salt
2 c well-shaken buttermilk
6 T unsalted butter, melted and cooled to room temperature
2 large eggs
Vegetable oil or spray for waffle iron


Whisk together flour, sugar, baking powder, baking soda, and salt in a large bowl.

Shake buttermilk well and pour into another bowl.  Add melted butter and eggs and whisk until combined.

Add buttermilk mixture to flour mix and whisk just until combined, don't overmix batter.
Spray or brush oil onto hot waffle iron and add 1/2 cup of batter into each waffle mold.  Cook waffles according to manufacturer's instructions until golden and cooked through, about 3 minutes. Transfer cooked waffles to a rack in the oven to keep warm.

If not using a belgian waffle maker, use 1/3 c waffle mix for each mold.